
-Ty
-Ty
In frustration, would be the one and only word that could sum up a day like today. To bad my frustration was not toward anyone in particular but an object or better yet a window. This is not just some ordinary window oh no, it is the window that seems to be the most difficult and stuburn thing in the entire world.
My day started out fine, I was told to close up the window like the all the rest of the windows half plywood, half OSB, and than we would but a strip of pine in the middle to act like framing since there wouldn’t really be a window going in this rough opening. So, I started to measure the OSB and got it in place and screwed it in, when I was informed that I needed to tape the window. Well, this isn’t a problem right, one should not be so sure because I had to tape the outside OSB to thesheathing in the interior. Well, this ment that I needed to remove and cut in half the pieces I has already made, take off the siding on the interior wall, remove a couple of the 2 x 4’s from the side of the window and pry open all four sides of the window. This was not an easy task at all, it took about 5 hours to complete and the tape was probably the worse part. However, it got finished and the window now even has a membrane on the exterior, and the pine in the center to make the window not the best looking thing in the world but a very well insulated and protectedrough opening.
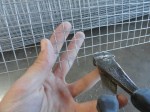
 Taping of the East window
 The window finished
 The uneven fit of the center pine
Today we managed to get all of the columns sanded and fastened together. The sanding proved to take much longer than expected but the end result was worth the effort.
 We were pretty excited about how straight we could get them considered the individuals sticks were not so straight to begin with.
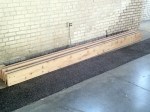
The group also managed to finish the floor for the shading structure. Picking up from yesterday, the pairs of “inner” floors were sheathed with 1/2″ OSB and joined together separated by 2×6 members. The pairs were flipped upside down (OSB face down) and the 2×6’s were attached. The OSB needs to be flush with the top edge of the 2×6, so the photo below shows the bottom side of the floor.

In order to relieve some of the loads on the suspended 2×4 ‘s, we attached some shims from our scrap pile that would increase the depth of the OSB and 2×4 and bring it exactly to that of a 2×6.

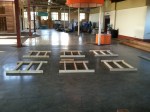
Today we had to park out of the regular lot because they were marking out a parking lot in the gravel. As soon as I got there I got to work on the light boxes. Soon the electrician showed up and we were underway. I got the LED cans in and finished up the rest of the wiring runs. We still have a couple issues to work out but all the electrical is looking great. Several trucks dropped of materials today and we got out mechanical system today. It was a bit more confusing than I expected. No lego booklet with this one, and a lot of the parts are labeled in german. The robot of a device was planned out on the floor so we could test fit everything. We scratched our heads for a while and put it the robot back in its box until tomorrow. Andrew and I finished up the shelving while the slats went up on the other side. It was rewarding to finish the south side of the shelving. It was exactly what Andrew and I had drawn up. It had a progression up even though no stairs existed. Tomorrow will be busy, I can’t wait to see this mammoth of a sliding door. Word in the passive house is that the sliding door weighs about a thousand pounds.
Today I jotted down some quick arithmetic to see if we have enough siding left to cover portions of the North and East face of the house. I was accused of being a mad scientist.

-Ty
Today I woke up and headed on our way to the Eco-Exhibit from Minnetonka. On the way we were slowed up by a bad crash in both east and west tunnels so Nick and I busted out the iPhone to find our way through traffic. We were about a half an hour late, not bad considering the traffic we almost got stuck in. On site I began work again on the shelving structure but soon switched over because the electrician had arrived. I gave him a rundown on the routes and left him to his work while Nick and I once again braved traffic in pursuit of some LED recessed fixtures. We ended up driving all the way to Plymouth to pick up the fixtures and we are still one short, but we will get it. Once back on site I continued to work on the shelving but only in brief moments. I was informed by the electrician that he ran into a little snag with the inspector and that we are unable to use the LED ribbon lights in the windows… Well this is still getting resolved it is a problem. I hope tomorrow we can begin to sort it out. The shelving was put in place and the day ended. I can already feel time creeping up on us.
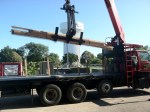


So today the wood showed up for our shading structure. After much anticipation we were finally able to begin! Most of the morning was spent sorting and pairing up the 2x8x12′ for the first row of columns. Each member was paired with another primarily based on both color/tone, and crown direction. After pairs were matched, we marked out the bolt placements and starting drilling holes through sets of pairs. After all of the holes were drilled they were off to the sander. Palm sanding action with some finely gritted paper smoothened each stick out to a smooth finish. When sanding was through it was time to start fastening the pairs together. Shortly after laying out the hole placement on the 12 footers, I began cutting the 14 footers to exact length and the previous process was repeated for this set. Later, Lyle and Melissa began assembling the floor structure. Some photos of the process thus far:
This gallery contains 14 photos.
Gabions today. I started by building a 32x16x4in block – the same size as the gabions on the north and east side. I unrolled the hardwire cloth and, once it was properly positioned, temporarily fastened it to the block. Then … Continue reading
Today was perhaps the slowest and quietly frustrating of the last week. Ty and I were tasked with assembling the shelving. We had to start by sanding the boards which slowed everything down. Some of the boards needed slight trimming to fit snuggly.
We started on the north side under the loft. We hit a snag when we moved away from the loft and found the second shelf to be wobbly. Chris Aldrich, Nick, and Johnny managed to solve the problem but they had the cut through the floor in order to re-block it.
When we started on the south, we realized that two boards were missing. I cut some pieces and then drove to Willy’s shop to join them. The biscuiting was fine, but I think the traffic doubled the length of the trip. I got back and we started on the south next to the loft. We finished that but called it a day after putting up the next post. The rest of the crew finished siding the west side – it looks fantastic!
Ty and I continued work on the shelving structure. We planed the rest of the 2x6s from Saturday along with some more cut today. We packed the whole lot in the box of Mike’s pickup and drove to Willy’s cabinet shop. We spent the rest of the day marking, biscuiting, and clamping.
We’ll begin assembling the shelving right away tomorrow morning. I, for one, am eager to get underway; we’ve now spent two days just doing prep work for this project. It’s refreshing to see other progress being made. The entire south side has been sided along with most of the west side. The interior sheathing has been taped and cedar cladding has been added to one of the LVL columns.
I expected working with Johnny on the interior roof sheathing and furring strips, but Nick asked Ty and I to begin on the shelving structure. That project has changed quite a bit even since the two of us worked on it in late July; the posts are now sized at 6×6 (rather than 4×4), the alignment has moved, and we’ll be using joined 2x6s from Ty’s granary instead on 2x12s.
That last change will roughly triple the amount of work to be done. We’ll have to saw twice as many boards, bring them to a cabinet shop, join them, then bring them back before we can even start assembly. But even though it will be a huge undertaking, I think it will be worth it. It’ll cost us in terms of labor, but we won’t have to buy new 2x12s. The reclaimed lumber, on the other hand, has a great deal of character but has had no use thus far except as scrap.
I spent the day taking measurements inside the cabin and then cutting boards outside. We can take the boards to the cabinet shop on Monday to begin joining them. We worked a three-quarter day and then went to a BBQ at Tom DeAngelo’s house.
Luke and I spent the day finishing the sheathing on the north side of the gables. We knew we had to add blocking on the building’s edge, but there was no obvious way of doing so. We ended up cutting a 2×12 to match the joists and then hoisting it into place. Since the 2×12 wasn’t as deep as the joists, we had to add some scrap to the top edge in order to bring them in line. Then we completed the plywood sheathing up the east side. We did the same on the west side but with OSB in the afternoon. Johnny and I finished the day by adding furring strips to the west side.
It felt like we took a very long time to get moving today, but we still made a fair amount of progress. The loft now has flooring, the roof has been sheathed (on the top, anyway), and siding has begun on the south side. I think our pace is slowing, however, and I suspect Sunday’s day-off will be important for recharging and staying on schedule.
I spent the entire day working on the roof. Ty and I started by getting a measurement for the front fascia board. The we cut the fascia and had it jacked into place where Johnny and I attached it. Then Mikey and Pauly joined us to set the first joists in place. Chris Aldrich was a huge help figuring out how to set the joists; we used hangers on the fascia and a bracket to hold them on the beam.
We seemed to make a lot of mistakes today, I hope they don’t come back to haunt us. Once we set the fascia, for instance, we realized that the furring strips on the south side would have to be trimmed. The loft, which was built outside and lifted into place, was apparently the wrong size meaning the posts in the cabin will no longer be aligned.
The morning was pretty slow and frustrating. I worked with Johnny, Nick, and Chris to finish the upper interior sheathing. It was pretty tedious; the pair on the scaffold would measure while the pair on the ground waited, then those on the scaffold would wait while the cut was made. We really struggled after lunch attempting to sheath the upper exterior on the west side. We cut and placed two pieces only to re-cut them later.
Later in the afternoon, Luke and I tilted up the microlam columns and braced them. Then the two of us and Ty double-checked our measurements for the building’s main beam. We cut the LVL beams and connected them in a tongue-and-groove pattern. After some supper, Ty and I got on the scaffold while the Nicks used a manlift to raise the beams. They slid the beams through the slots in the gables until Ty and I could place and fasten them to the columns. We clamped and fastened the final piece of the beam in place and called it a day around 9pm. Tomorrow the roof.
The gables are in place! I had been really eager to see them installed, so I was a bit disappointed after Dusty and I spent the first part of the morning pulling nails from boards. The boards needed a once over to make sure they were free of metal before being resurfaced in the planer. The boards were ‘de-nailed’ but still had quite a few brads hidden within. Dusty counted 126 of the little devils by the time we were through.
After break, Ty and I put on the harnesses and began placing the gables. The east side went in brilliantly – the fit was totally perfect. The west side wasn’t so great and we had to do a lot more strong-arming. It took quite a while but we eventually got them in place. The last thing we did was add a 2×12 top-plate to the northern slope of the gables. Peter and Nick were debating how to assemble the south slope and roof.
I can’t say that I’m a fan of the harnesses. Perhaps it is safer, but without a proper place to tie them they become a huge liability. Ty and I had to tie onto the same window headers we were building on top of. We were barely mobile to the point of standing on our knees while installing the nearest truss. At one point, the whole truss nearly fell off the scaffold as Ty was shifting positions. I couldn’t move to stop it and Ty, as strong as he is, was just able to catch it before it tumbled off entirely. I expected the harnesses to provide some piece of mind, but I think they caused us both more anxiety than they were worth.
Although it’s a long way from completion, the gables fill out the shape of the cabin. It really does look like the thing that our section designed and modeled so many months ago. And although that much is pretty exciting, I can’t shake the feeling that we are working on a final, full scale model of our design; it’s a real shame that its relocation fell through.
Brittany, Luke, and myself started the morning by placing a top plate across the north wall. That piece helped tie all three walls together as well as allowed us to get measurements for the longer gables.
While the other groups began work on the sheathing, the three of us along with Paul began to build the rest of the gables. In order to maintain a consistent slope, we began with the shorter triangular pieces we built yesterday. We added blocking and guides to help with our measurements. Luke and I spent nearly the entire day sizing the pieces and then finessing them into place.
The design required us to build the shape four times – twice atop two walls – so it was a relief to get it done. I’m still nervous, however, because we don’t know for sure if the pieces will fit as they should. We built them entirely on the ground and, with the exception of the bottommost chord, haven’t seen them in place. Tomorrow morning we’ll get another harness and scaffolding and see what they look like on top of the walls (*fingers crossed).
oday started a bit sluggishly. Everyone worked so hard yesterday that we paid for it today. Even so, we accomplished a lot. Mikey, Luke, and myself worked on framing the shorter gable and added the last cripples to the main columns. By the time that was done, the others had laid out and assembled the entire north wall. Everyone worked together to lift the remaining section of the east wall into place and fasten it to the column. Then we lifted the entire north wall and lifted that into place as well (after turning it around).
We packed up early; everyone was aware that placement of the north wall wasn’t scheduled until Friday. Having the afternoon free was much appreciated. A number of us spent the evening relaxing at Pauly D’s taking maximum advantage of the backyard pool.
Fantastic work today. We built-up and placed the remaining headers only to find that the rough openings were askew. So we took everything down and adopted a new strategy: start from the southwest corner and work out. This was far more effective and we soon had everything square and plumb. We then added the upper cripples including some nice work by Brittany, Luke, and myself above the southwest corner.
The most exciting part of the late afternoon was building the enormous header across the south side. We lifted half the member into place and used a temporary ‘hinge’ and clamps to align the whole piece. We did this twice so that we had two, two-ply headers over twenty feet long.
We continued working well past quitting time. We added the double-stud frames needed to complete the south and west as well as half of the east side. The other half was assembled on the ground and will be tipped into place tomorrow morning. We made a lot of progress today – everyone worked extremely hard. All said, the day ended twelve and a half hours after it began!
It took us a while to get rolling this morning. We had to determine the best way of adding the extra blocking to the south and west sides of the diaphragm which will directly support the windows. Once we got the hang of it, though, we made good time. We also began assembling the huge built-up columns that will frame the windows. By noon, we had two of these columns in place.
We moved quickly in the afternoon, building and placing all but one of the columns. The other six were braced so that they could be plumbed and tied together with headers. We worked late and placed to of the headers by day’s end.
A new motto for the Architecture student: Achievement or embarrassment, always document.
